
Getting Started
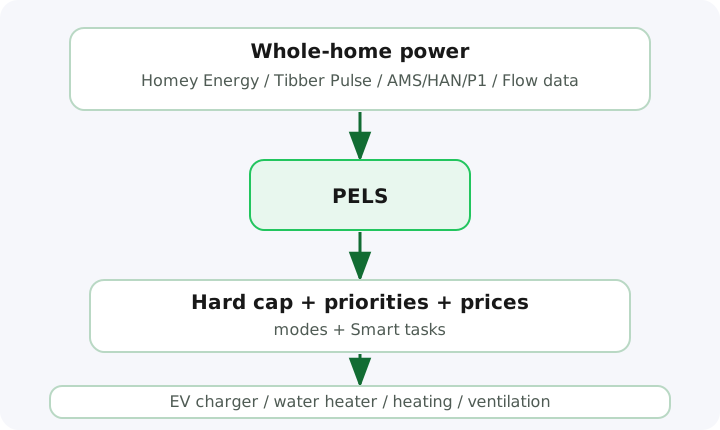
PELS is the Homey app that takes your heavy electrical loads off your hands. It keeps your power usage inside your capacity limit, decides which devices to turn down first, plans Smart tasks around deadlines, and shifts flexible load into cheaper hours — automatically, every hour.
In practice, most users spend their time in More -> Apps -> PELS -> Settings and a small number of Homey Flows.
If PELS is not installed yet, get it from the Homey App Store.
Before you begin
- PELS must already be installed on your Homey Pro.
- You need a whole-home power meter paired with Homey (e.g. Tibber Pulse, AMS/HAN reader, P1 reader, Shelly EM) or another Flow source that can report current load in watts.
- You should know which devices in your home use the most power and can tolerate being turned down temporarily.
Open PELS settings
In the Homey app, open More -> Apps -> PELS -> Settings. This is where all configuration happens. Homey does not take you there after installing, so this is the first thing to find.
The first time you open it, the Overview shows a Set up PELS card with what PELS needs before it manages anything: your power meter and the devices it manages. Once a device may be limited, the card also shows the hard cap PELS is holding it to, so you can set your own. With two or more such devices it asks which should keep running longest; you can reorder them or keep the order shown. Each row opens the page where you do that step, and the card shows what is done as you go. The same card sits under Settings > Setup & recommendations. It disappears once everything that applies to your home is done.
When it does, the Overview may show PELS can do more for this home. That opens the features that apply to your home and are not in use yet: following electricity prices, using your own solar, and Smart tasks. Each one can be dismissed if it is not for you.
Step 1: Connect your power meter
Live power input is what PELS plans on — connect it once and every other feature unlocks.
Easiest path — use your power meter. If your power meter is marked Tracks total home energy consumption in Homey and it is the only whole-home meter Homey lists, PELS starts reading it on its own shortly after starting, unless it has ever received readings from a Flow. No Flow and nothing to pick. This works for Tibber Pulse, P1/HAN readers, Shelly EM, and similar. If you have several meters, or you chose the Flow source earlier, go to Settings > Limits & safety, set Power source to Power meter, and pick the meter under Whole-home meter.
See Using Homey Energy for the full walkthrough, including how to also read electricity prices from Homey Energy (especially useful outside Norway).
Alternative — feed power via Flow. If your meter is not in Homey Energy, or you want to combine sources before sending the value to PELS, create a Homey Flow that calls the Report power usage action whenever your meter updates. Input is current power in watts.
Once power data is flowing, the Overview page starts showing real data.
Step 2: Set your capacity limit
Go to Settings > Limits & safety and configure:
- Capacity period — choose Hourly average for hourly tariffs, or 15-minute average when your grid tariff measures quarter-hour peaks (Belgium's capacity tariff, and 15-minute peak tariffs in several other markets).
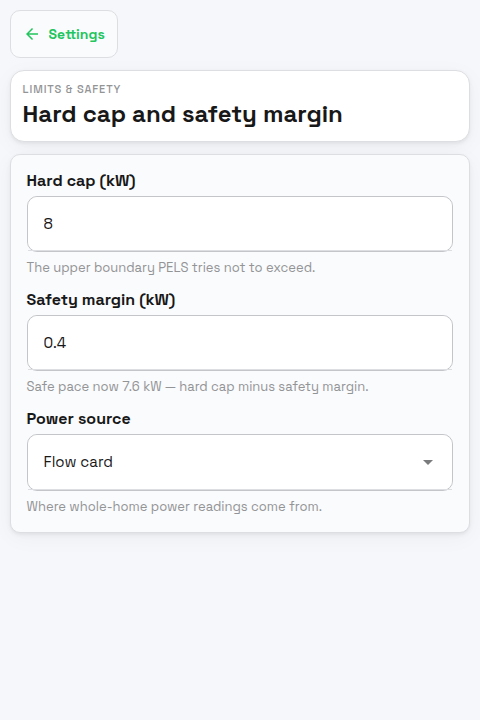
- Hard cap (kW) — the average power level you do not want the selected period to exceed. Set this to match the peak or tariff step you want PELS to protect, for example 5 kW or 8 kW. If you have no capacity tariff (the Netherlands, for example), set it well above what your home ever uses; PELS then never limits for the hard cap, and everything else still works.
- Safety margin (kW) — a buffer below the hard cap. PELS starts turning things down before you actually hit the limit. A margin of 0.3-0.5 kW is a reasonable starting point. On the 15-minute period this margin is the whole buffer, so size it for your slowest device. See Tips > Capacity tuning.
With the 15-minute period selected, a 5 kW hard cap gives each quarter a 1.25 kWh allowance. The page also reports the highest fully tracked quarter-hour average in the current month. This is a control aid based on the readings PELS received; your grid operator may apply a minimum peak or combine monthly peaks when calculating the bill.
TIP
Enable Simulation mode in Settings > Simulation mode while you are getting started. PELS will calculate what it would do without actually controlling any devices. This lets you verify the setup is sensible before giving PELS real control.
Step 3: Choose which devices PELS controls
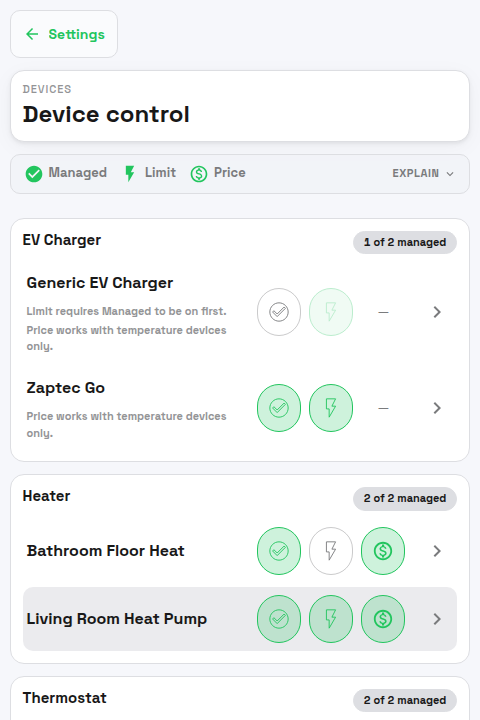
Go to Settings > Devices. For each device you want PELS to manage, configure:
| Control | What it means |
|---|---|
| Managed | PELS includes the device in its planning. Unmanaged devices are treated as background load. For devices with a power reading, turning Managed on also turns on Limit. |
| Limit | PELS is allowed to lower, pause or turn this device off: to stay within your hard cap, to keep to your daily budget, or to follow your solar surplus. |
| Price | PELS adjusts this device's temperature targets based on electricity prices (only relevant for temperature devices). |
Good first candidates are water heaters, floor heating, panel heaters, and ventilation — devices that use a lot of power but can tolerate being turned down for a while.
Step 4: Set up modes, priorities, and targets
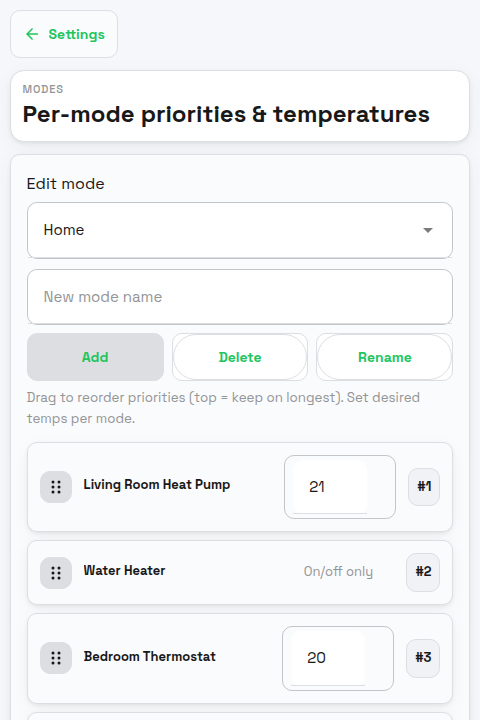
Modes are the core of how PELS decides what to do. Each mode stores a separate set of priorities and target temperatures for your devices. Go to Settings > Modes to configure them.
Create your modes
Common modes are Home, Night, and Away. Think of them as profiles for different situations:
- Home — normal daytime comfort
- Night — keep bedrooms warm, lower priority on other heating
- Away — reduce everything to minimum acceptable levels
Set priorities and target temperatures
For each device in each mode, you configure two things:
- Priority — a number where lower means more important. When PELS needs to turn things down, it starts with the highest-numbered (least important) devices and works its way up. When there is room again, it resumes devices in the opposite order.
- Desired temperature — the target temperature PELS will set for this device in this mode (for temperature devices).
For example, in Night mode you might set:
- Bedroom heater: priority 1, target 20 °C — stays on as long as possible
- Living room heater: priority 2, target 18 °C — turned down before the bedroom
- Water heater: priority 3 — limited first if needed
Switch modes with Flows
Modes only take effect when activated. Create Flows to switch modes automatically:
- Time-based: Set mode to Night at 23:00, Home at 07:00
- Presence-based: Set mode to Away when everyone leaves, Home when someone arrives
- Manual: Use a virtual button or the Homey app to switch modes on demand
Use the Set operating mode Flow action card to change the active mode.
Re-sending the current mode is also a simple way to reapply targets if a device has drifted from its target temperature.
Step 5: Add price optimization (optional)
If you want PELS to shift heating to cheaper hours, go to Settings > Electricity prices:
- Choose your price source — Norway (spot + grid tariff) if you are in Norway, or Homey Energy, Power by the Hour or a Flow card for other sources. If you already run the Power by the Hour app, that source needs no setup beyond picking it.
- Make sure the price status shows that data is available.
- If using the Norway source, select your county, grid company, and tariff group.
Then go to Settings > Devices, open each temperature device that should participate, and enable Price or Setup > Price-based control. Water heaters and floor heating are the highest-impact picks — they carry the thermal mass that makes shifting pay off.
After at least one device has price response enabled, use Settings > Price-aware devices to turn Respond to prices on or off globally and set per-device temperature adjustments:
- Cheap (°C): the cheap-hour boost, how far the temperature goes up while power is cheap, for example 2 °C.
- Expensive (°C): the expensive-hour reduction, how far the temperature goes down while power is expensive, for example 2 °C.
Step 6: Add Smart tasks (optional)
Use Smart tasks when one device must reach a target by a specific time. For example:
- charge an EV to 80% by 07:00
- heat a room to 21 °C by 06:30
- heat a water heater before a busy morning
Smart tasks are created with Homey Flow action cards such as Add charging task and Add heating task. See Smart Tasks for the full guide.
For dashboard-driven setup, pin the New smart task widget. It lets you pick a managed device, preview the ready-by window, and create a one-off task. The Smart tasks widget then shows active task status, and Held-back devices can offer Let it run now for a device PELS is holding back.
Quick setup checklist
Once you have worked through the steps above, verify:
- Your power meter Flow is running and the Overview shows current usage.
- A hard cap and safety margin are set in Settings > Limits & safety.
- At least a few devices are marked as Managed and have Limit enabled.
- You have at least one mode with sensible priorities and targets.
- You have Flows to switch between modes.
- Optional Smart task Flows are configured for devices that need a target by a ready-by time.
- Simulation mode is disabled when you are ready for PELS to take real control.
Terminology and units
- Power is instantaneous load, measured in W or kW.
- Energy is usage over time, measured in kWh.
- Hard cap — your maximum average power for the selected capacity period, in kW.
- Safety margin — a buffer below the hard cap where PELS starts reacting, in kW.
- Available power — how much more load PELS can fit right now before it reaches the current safe pace, in kW.
- Daily budget — an optional soft guide for total energy in a day, in kWh. Used to spend less by shifting load into cheap hours or to hold the home under a daily energy ceiling; it never overrides the selected-period hard cap. See Daily Energy Budget.
For the full vocabulary, see the Glossary.
What to read next
- How PELS Decides for the plain-language mental model
- Configuration for the full settings reference
- Cost-Saving Functions for choosing between power limiting, budget, price shift, tasks, and Flows
- Smart Tasks for charging or heating a device by a ready-by time
- Book Cheap Hours With Flows for fixed cheapest-hour windows
- PELS Insights for dashboards and quick status
- Configure an EV Charger for current-controlled EV charging
- Tips and Best Practices for tuning advice
- Daily Energy Budget for daily pacing and budget control
- Glossary for any term, defined
- Troubleshooting when something isn't behaving as expected