
Meter Areas
Some homes have more than one electricity meter. A rental unit, an annex, or a cabin often has its own meter and its own grid tariff step (effekttrinn). Meter areas let PELS treat each of those parts of your home as a separate capacity budget: it counts a part's devices against that part's meter and keeps each one under its own limit, instead of lumping everything together under one whole-home cap.
Everything not placed in a meter area belongs to the Main home, which keeps working exactly as it always has.
When you'd use this
Set up a meter area when a part of your home:
- Has its own electricity meter that Homey can read, and
- Has its own capacity limit you want to hold, most often its own grid tariff step, billed separately from the main house.
The classic case is a rental unit with a separate meter and a separate bill. Without meter areas, a busy evening in the rental would eat into the main house's available power (and the other way around). With a meter area, each part stays under its own cap on its own terms.
If your whole home is on a single meter, you don't need this. One meter is the Main home, and the selected-period hard cap already covers it.
A meter area can be somewhere else entirely
The parts don't have to share a building. A cabin at another address works too, as long as its devices are cloud-connected (Wi-Fi or cloud integrations, controlled over the internet), so your Homey Pro can manage them from afar. Only devices on a local radio (Zigbee, Z-Wave, Bluetooth, 433 MHz) need the Homey physically nearby, so a cabin whose devices are all cloud-connected can be run entirely remotely.
What you'll need
- Homey Energy as your power source. Meter areas rely on each meter reporting its own live power to Homey. This is the Homey Energy setup, not the Flow-driven power source: a Flow power reading has no meter identity, so PELS can't tell which area it belongs to. PELS enforces this both ways: saving a meter area is refused while your power source is Flow, and switching the source to Flow is refused while meter areas are running. Removing an area works on any source.
- A meter for the area, already added to Homey. Each meter area is built around one power meter that Homey reads as that area's total: a HAN/P1 meter reader or another sensor-class power meter. An ordinary metering smart plug or appliance won't appear in the picker, because PELS only offers real whole-area meters, so it never mistakes one device's draw for the area's total. Add the meter to Homey first, then pick it here.
- The Main home's own meter picked. Before you can save your first meter area, the Main home's Whole-home meter must be chosen under Settings → Limits & safety (with a single meter marked as tracking total home consumption, PELS picked it on its own). PELS refuses to save an area until then, and refuses assigning that same meter to an area. The Giving the Main home its own meter section explains why.
- Your zones set up to match. PELS assigns devices to a meter area by Homey zone: you point the area at the zone that part of your home lives in, and every device in that zone and its sub-zones counts toward that area. A tidy zone layout (for example, an "Apartment" zone with the rental's rooms under it) makes this a one-click choice.
Setting up a meter area
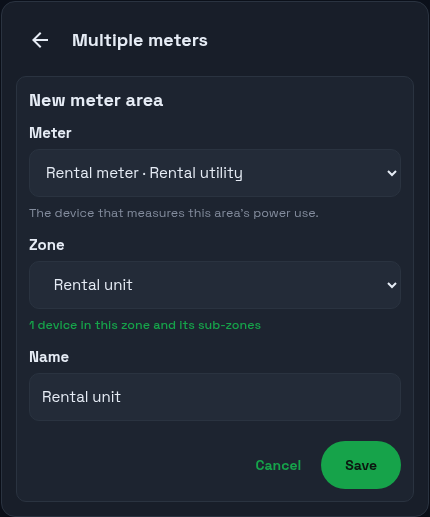
Open Settings → Multiple meters and choose Add meter area. You fill in three things:
| Field | What it is |
|---|---|
| Meter | The meter that measures this area's power use. PELS lists the whole-home and sensor-class power meters it found in Homey. |
| Zone | The zone this meter covers. Devices in this zone and its sub-zones count as part of the area. |
| Name | What you'll call it: "Rental", "Annex", "Cabin". |
As you pick a zone, PELS shows how many devices fall into the area ("4 devices in this zone and its sub-zones") so you can check the sweep before you save. It also pre-suggests a zone based on where the meter sits, and warns you if the meter you picked sits outside the zone you chose, usually a sign the zone is too narrow.
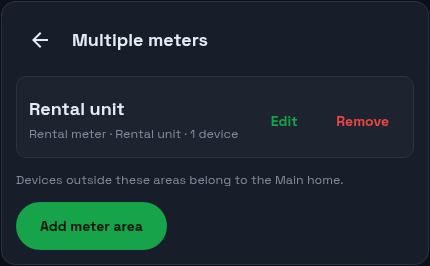
When you save, the area appears in the list with its meter, zone, and device count. Its devices are now assigned to the area and measured against its meter right away. Actually limiting them is a separate, deliberate step: a new area only simulates until you turn on control (see below), so nothing in it is turned down the moment you save.
The Main home is automatic
You never configure which devices belong to the Main home. It's simply everything that isn't in a meter area. Add a rental as a meter area and the rest of the house stays in the Main home automatically; remove the area later and its devices move straight back.
There is one Main-home measurement step, and PELS asks for it before your first area is saved: select the Main home's own Whole-home meter under Settings → Limits & safety. The section below explains why.
Setting each area's limit
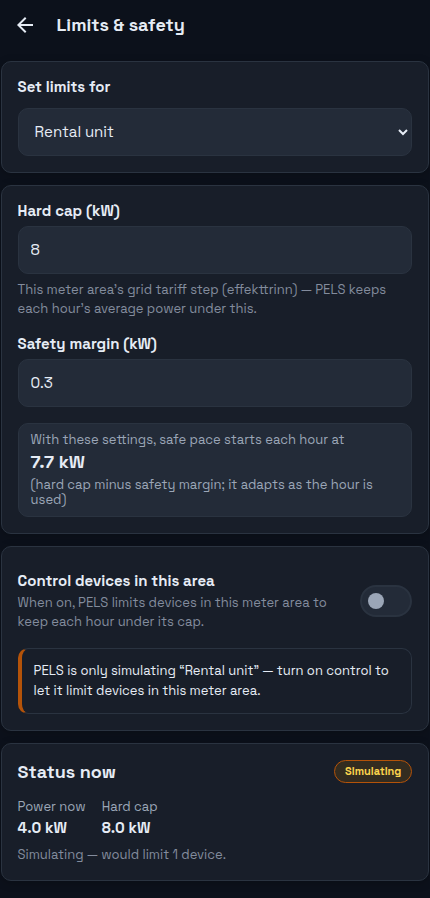
Each meter area gets its own limit under Settings → Limits & safety. Once you have at least one meter area, a "Showing" bar appears above that page. Pick the Main home or any meter area there, and the cap and margin below apply to whichever you've selected. The bar stays put as you scroll, so the part of the home you're editing is always named on screen:
- Capacity period: hourly, or 15-minute for a quarter-hour peak tariff.
- Hard cap (kW): that area's grid tariff step or peak target. PELS keeps the selected period's average power under this, the same way it does for the whole home.
- Safety margin (kW): the buffer below the cap where PELS starts easing off, so you approach the cap gently rather than bumping into it.
Below those, a readout shows where the safe pace starts each period (the hard cap minus the safety margin), so you can see the effect of your numbers before you leave the page. On a 15-minute area that is also the level the safe pace stays at, since a quarter never bursts above it. A 15-minute area also shows its highest completed quarter this month.
Turn on control when you're ready
A new meter area starts in simulation: PELS watches and plans for it, and holds off on turning anything down. A single switch, "Control devices in this area", is what makes it live:
- Off: PELS only simulates this area. Nothing in it is limited. This is how every area starts, so you can set the cap and watch how PELS would behave before it touches a device.
- On: PELS limits devices in this area to keep each selected period under its cap, for real.
While an area is simulating, the page says so plainly and points you at the switch. Flip it on once the cap looks right, and PELS begins holding that area to its limit.
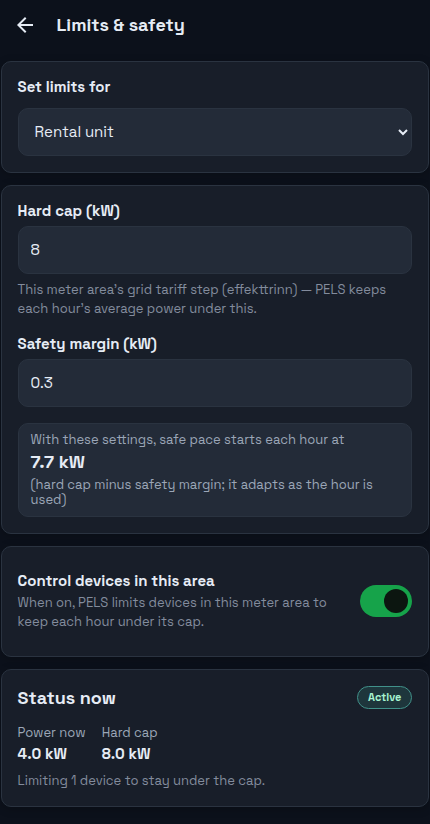
While only part of your home is simulating, the Settings page's Simulation mode entry shows a Partly on chip, and a banner names the part still simulating, so a half-live setup is never mistaken for a fully live one.
Simulate first
Simulation is the safe way to trial a new area. Leave control off for a while and watch the area's own status on its Limits & safety card (power now, and what PELS would limit to hold the cap), then turn control on with confidence. The Overview and Usage tabs follow the shown home too: pick the area in the Showing bar to see its live status and its own recorded history.
Giving the Main home its own meter
The Main home's meter is the one chosen under Whole-home meter in Settings → Limits & safety; a home whose only meter is marked Tracks total home energy consumption can leave that to PELS, which names it shortly after starting. Once you split the home across meters, PELS requires it to be chosen before the first area can be saved, and the same meter cannot belong to both the Main home and an area — that named pair is what tells the homes apart.
An explicit selection tells PELS which meter you intend to use for the Main home. PELS cannot infer what that physical meter covers, so choose one whose reading excludes every meter area.
A combined total that already includes a meter area. PELS cannot detect that composition from the number alone. If you select it for the Main home, Main-home devices may then be limited for usage that belongs to an area.
A meter area's own meter. PELS refuses assigning the same explicit meter to both the Main home and an area. Its runtime safety checks also refuse Main-home commands if a legacy or transient sample can be proven to carry an area's meter identity. That is recovery protection, not a supported way to configure the home.
Make the one-time pick under Settings → Limits & safety → Whole-home meter. Once the Main home has a meter whose reading excludes every meter area, each part is measured and limited on its own. If no such meter exists, PELS cannot separate the Main home from those areas.
What a meter area governs
A meter area is about capacity and safety for its own meter. Each one has its own hard cap and safety margin, and its own real-time limiting and resume on that meter.
Each home has its own modes and device priorities. On the Modes page, use Showing to choose Main home or a meter area, then arrange only the devices assigned there. The same mode name can mean different temperatures and priorities in different areas.
Your per-mode temperature settings apply inside meter areas too. Where you have set a target for the current mode, a heater or thermostat in an area is held at it, and PELS writes its setpoint to get it there, the same way it does for a Main-home device. That target is also what PELS puts the device back to after lowering it to protect the area's cap, so a device with no target for the current mode can stay at the lowered setpoint. Set one on the Modes screen for every heater you want PELS to bring back. Change mode and the area's devices follow within about half a minute; a change that would raise a device's setpoint waits until PELS has a live reading from the area's meter, the same rule as below.
The Devices list labels every device with the part of the home it belongs to. The Modes list is filtered to the home selected under Showing. Settings lists a current-mode selector for Main home and for every meter area.
Some PELS features stay with the Main home. The daily energy budget, price-based load shifting, and smart tasks plan and measure your Main-home devices, while each meter area runs on its own cap, safety margin, and priorities. The Budget and Smart tasks pages say so once you have meter areas, and PELS tells you if you set a smart task on a device that lives in a meter area.
A home battery in a meter area keeps its own mode. PELS shares solar with home batteries and calls on them to hold your limit in the Main home; in an area, the battery's own app stays in charge.
Flow cards split three ways. Cards that act on a device work wherever that device lives, including inside a meter area: turning power-limit control on or off for it, budget exemptions, Is device managed by PELS?, expected power usage, and the stepped-device reports. Cards about modes, prices and the daily budget are settings for the whole app, so they behave exactly as they always did. The cards that read or write a capacity number work from the Main home: Is there enough available power?, Is there available power for device? and Set capacity limit, even if the device you pick lives in a meter area.
Two triggers are area-aware. Hard cap breach imminent — manual action needed and Hard cap breach imminent for at least... each carry a Home tag naming the part of the home with no managed devices left to limit, so a single Flow can tell you where to go and switch something off.
Tips and troubleshooting
- "Meter not found" / "Zone not found" on an area. The meter device or zone it was built on no longer exists in Homey (renamed away, removed, or a device swapped out). Edit the area and re-pick the current meter or zone.
- The apartment's devices aren't being limited. Check that "Control devices in this area" is on for that area; a new area simulates until you turn control on. Also confirm your power source is Homey Energy.
- Saving the first area asks for the Main home's meter. Set the Main home's Whole-home meter (see above), then save the area again. PELS will not save the meter area while the Main home has no meter of its own.
- Saving an area is refused over its name. Each area needs a name of its own: not blank, not another area's name (spelling it differently in upper or lower case still counts), not "Main home" (that is what PELS calls everything outside your areas), and at most 40 characters. PELS says which of these applies.
- "PELS handles up to 8 meter areas." Eight is the limit. Remove an area you no longer meter separately to make room.
- A device is in the wrong area. Devices follow their Homey zone. Move the device to the right zone in Homey, or adjust the area's zone, and the device re-homes accordingly.
- An area's heaters are stuck below their per-mode temperature. First check that the heater has a target set for the current mode on the Modes screen. If it does, check that the area's meter device is online and reporting in Homey Energy: PELS does not raise a heater's setpoint in an area it has no live reading for, because that adds power draw it would not be able to see. Lowering a heater's setpoint still works, so a switch to a cooler mode always takes effect. Cooling-capable devices (air-conditioning, heat pumps, air-treatment units, and thermostats that may control one) are held in both directions while the meter is quiet, since cooling harder adds draw too.
See also
- Configuration: the hard cap and safety margin, explained for a single-meter home.
- Using Homey Energy with PELS: the power source meter areas build on.
- How PELS decides: what "limiting" and "safe pace" mean in practice.